

A good island kitchen layout drawing shows the existing room, the island's full footprint, and the space people need to work around it. Measure your clear spans first, then shortlist kitchen islands that fit them. Drawing the island as a rectangle in the middle of an empty room hides the narrowest points, and those points decide whether the plan works.
Graph paper, a scale ruler, or a simple drawing app is all you need. Use one scale, measure finished surfaces, and draw open doors and drawers as well as closed ones.
Table of Contents
Draw the existing kitchen before adding the island
Measure the room perimeter and mark windows, doors, wall returns, and columns. Add existing cabinets using their countertop edges, and note any appliance that projects farther into the room, because that front sets your narrowest gap.
Mark each door hinge and swing, plus the route from the kitchen entrance to the rest of the home. An island that fits inside the room outline can still block a doorway.
Write the scale on the page. For graph paper, one square can equal six inches. Keep the real measurements beside the scaled lines.
Separate three drawing layers
- Fixed layer: walls, windows, existing cabinets and appliances.
- Island layer: the island as a removable paper shape or separate digital object, with its full top and storage-facing side labeled.
- Use layer: open doors, drawer pull-out lines, occupied stools, and walking routes.
Use different line styles for furniture edges and operating areas. This shows exactly which item causes a conflict.
Put working clearances on the plan
Use the NKBA Kitchen Planning Guidelines from the National Kitchen & Bath Association as your baseline:
- 42 inches for a work aisle with one cook
- 48 inches for a work aisle with two or more cooks
- 36 inches for a walkway
- 36 inches to edge past a seated diner, or 44 inches to walk past
Measure every aisle at its narrowest finished surfaces, including a refrigerator or range front that projects into the gap. Record the gaps on all four sides of the island. Equal spacing looks tidy, but an offset island often works better. Place it by function first, then check the visual balance.
A dimensioned example
Take a space with a 140-inch clear span across opposing finished fronts and 168 inches along the island's length. A centered 72 × 32-inch island leaves:
Drawing entry | Calculation | Result |
Side gaps (span 140", depth 32") | (140 − 32) ÷ 2 | 54" each side |
End gaps (length 168", island 72") | (168 − 72) ÷ 2 | 48" each end |
Side gaps with a 35"-deep island | (140 − 35) ÷ 2 | 52.5" each side |
Both side gaps clear the 48-inch two-cook aisle, and a 3-inch change in island depth moves each gap by 1.5 inches. That is why you should draw exact product dimensions.
Island layouts by kitchen shape
The kitchen shape decides where the island can go and how deep it can be. Use the minimum widths below as your first check, then draw the actual room.
Kitchen shape | Where the island goes | Minimum clear width (island 32" deep) | Calculation |
One-wall | Parallel to the run | 134" from the wall to the opposite wall or open edge | 24 counter + 42 aisle + 32 island + 36 walkway |
Galley | Between the two runs, only if they are wide enough | 116" between facing counter fronts | 42 + 32 + 42 |
L-shape | Parallel to the longer leg, offset toward the open side | 110" from the long run's counter edge to the room's open side | 42 aisle + 32 island + 36 walkway |
U-shape | Inside the U, parallel to the base | 116" between the two arms (128" for two cooks) | 42 + 32 + 42, or 48 + 32 + 48 |
The same formulas work for any island depth. A 35-inch-deep island needs 3 more inches in each row above.
One-wall kitchen
All cabinets and appliances sit on one wall, so the island runs parallel to them, usually with the sink or cooktop side facing it. Draw a 42-inch aisle between the counter and island, and keep the other side at 36 inches or more if it is a pass-through route. If the room is shallower than about 134 inches, switch to a narrower island or a mobile cart. Seating goes on the side facing the open room, so stools stay out of the cooking aisle.
Galley kitchen
Two parallel runs form the work zone, and there is rarely space for a full island. Check the width between facing counter fronts. At 116 inches or more you can fit a 32-inch island with 42-inch aisles on both sides. At 90 to 115 inches, use a narrow island or movable cart and treat it as a prep surface only. Below that, skip the island and add counter space on the runs. Check both ends too, since a galley with a door at each end needs a clear route through.
L-shape kitchen
The island sits parallel to the longer leg, with the open side of the L facing the dining or living area. Place it so the aisle from the long run is 42 inches or more, then measure the gap from the island to the short leg. The corner usually has the tightest turn. Offset the island toward the open side to protect that corner. This is the layout where seating on the open side works best.
U-shape kitchen
The island sits in the center of the U, so the arms on both sides set its depth limit. With a 116-inch clear width between arms, a 32-inch island leaves 42 inches each side. For two cooks, you need 128 inches. At the base of the U, leave at least 42 inches from the island end to the wall cabinets, and 36 inches or more at the open end. If the arms are closer than 116 inches, a peninsula attached to one arm is the better choice.
Island options to test in your drawing
Each island below comes with its footprint, the kitchen shape it suits, and a day-to-day scenario, so you can drop it straight into the formulas above.
Island | Footprint (W × D × H) | Best kitchen shape | Clear width needed (42" aisles) | Standout feature |
72" waterfall LED island | 71.7 × 35.4 × 36.2" | L-shape, open-plan | 119.4" | Dimmable LED, fluted panels, waterfall edge |
72" Japandi wood island | 72 × 32 × 35" | U-shape, tighter L-shape | 116" | Left- or right-facing layout, wood or sintered stone finish |
Arune 71" glass-front island | 71 × 32 × 35" | One-wall | 116" (134" with a 36" walkway behind) | Glass-front cabinets, 3-tone lighting, hidden cable cutout |
72-inch waterfall island with dimmable LED lighting: the open-plan hub
The 72-inch LED-lit waterfall kitchen island measures about 71.7 × 35.4 inches and stands 36.2 inches high. It offers storage, dimmable LED lighting, fluted panels, a waterfall edge, and several color options. The waterfall edge and fluted panels give the island a finished look from every side, so it works in a kitchen where guests see it from the living room as well as from the cooking zone.
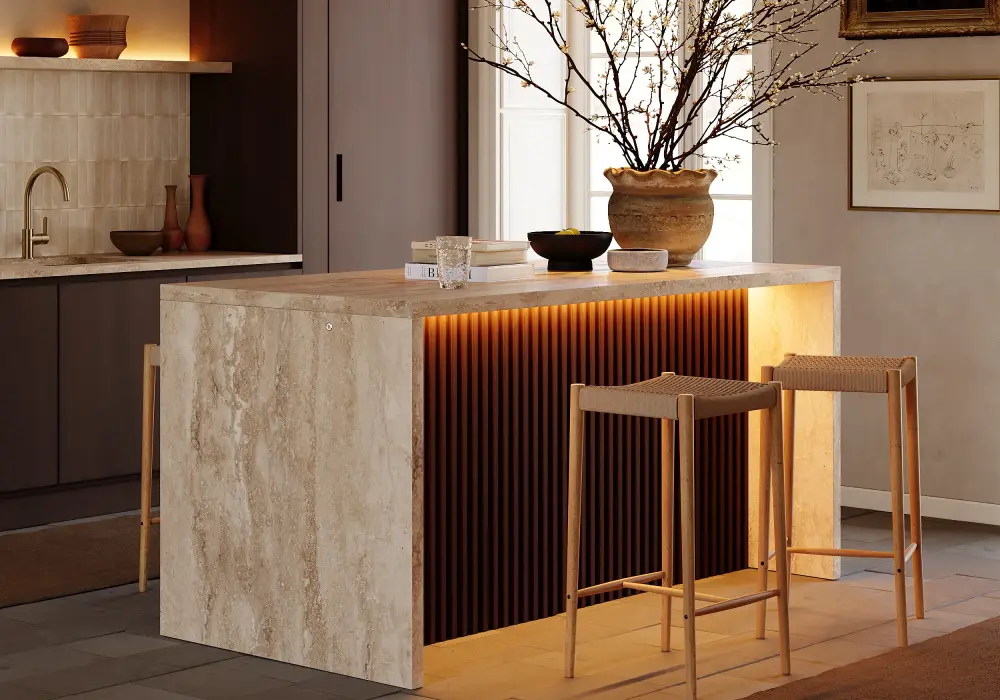
Fit in the drawing. With 42-inch aisles on both sides, the 35.4-inch depth needs 119.4 inches of clear width. If you plan stools along one long side and want people to walk behind them, use 44 inches on that side: 42 + 35.4 + 44 = 121.4 inches. In an L-shape kitchen, offset the island toward the open side so the corner stays clear.
How it gets used:
- Weeknight prep and homework. Chop on the work-zone side while a child does homework on the open side. Dimmable LEDs can run bright for cutting and knife work.
- Family dinners. Dim the lights to a warm level in the evening, and the island turns into a casual dining counter without moving anything.
- Entertaining. Set out drinks and appetizers on the top, with guests on the open-room side and the cook working from the storage side. The two sides stay separate, so nobody gets in the way of the stove.
Drawing tip. Pick the color to suit the room's cabinetry, and draw the fluted side facing the open room. Mark where stools would sit on the layout so the walk-past gap is on paper before you order.
72-inch Japandi-style island with left- or right-facing layout: the family meal island
The 72-inch Japandi-style kitchen island is 72 inches wide, 32 inches deep, and 35 inches high. It comes in wood and sintered stone finishes, and in left-facing or right-facing versions. Drawers, cabinets, and shelves are all built in, so pots, dishes, and small appliances have somewhere to go.
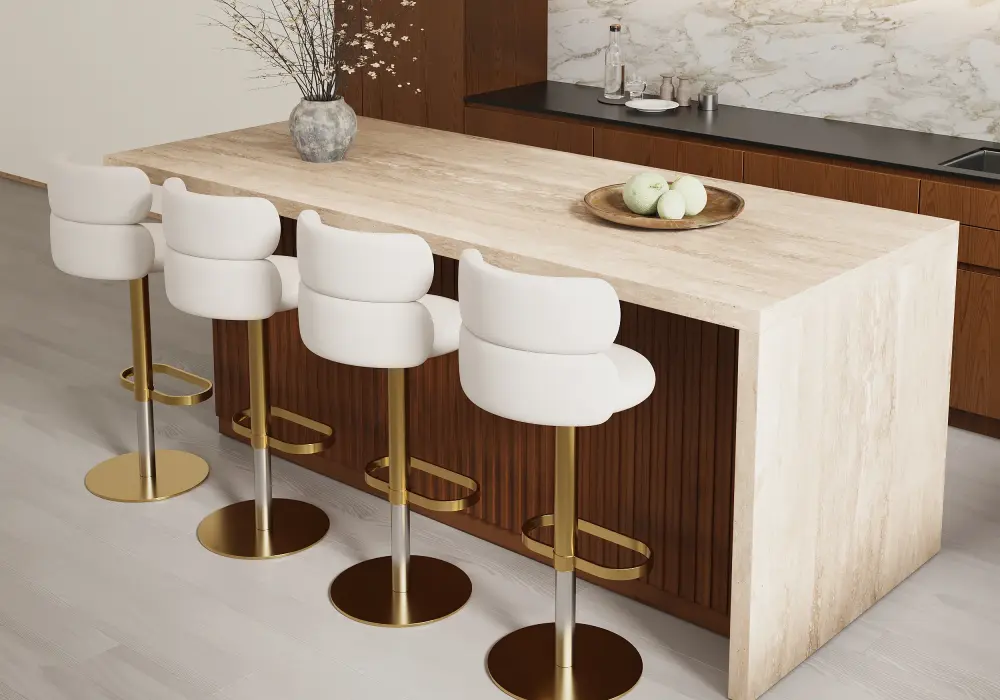
Fit in the drawing. The 32-inch depth works with 116 inches of clear width and 42-inch aisles. That is 3.4 inches less than the waterfall model needs, which is why this island suits a U-shape kitchen or a tighter L-shape. Its 72-inch length also leaves room at the ends in a 168-inch space, giving 48-inch end gaps, as in the example above.
How it gets used:
- Family meals. The wide top has room for a few place settings on one side, with serving dishes in the middle. Small households can use it for everyday breakfasts and lunches and keep the dining table for larger meals.
- Baking and big prep jobs. The surface is long enough to lay out ingredients, a mixer, and a cutting board at once, while the drawers keep tools within reach.
- Storage by the stove. Choose the facing so drawers open toward the cooking side, and the pans, utensils, and spices you reach for most are one step away.
Drawing tip. The left/right option changes which end the cabinets open from. Draw both versions on your plan and keep the one whose drawer fronts do not collide with a door swing or the dishwasher. Choose wood for a warm look, or sintered stone for a cooler, harder-wearing top, and match it to your cabinet finish.
Arune 71-inch island with glass-front storage: the display and entertaining island
The Arune 71-inch LED-lit kitchen island with glass-front storage measures 71 × 32 × 35 inches. It has spacious drawers, adjustable shelves, and glass-front cabinets with arched doors and gold-tone handles. Three-tone ambient lighting switches between warm, neutral, and cool, and a hidden cable cutout keeps appliance cords out of sight.
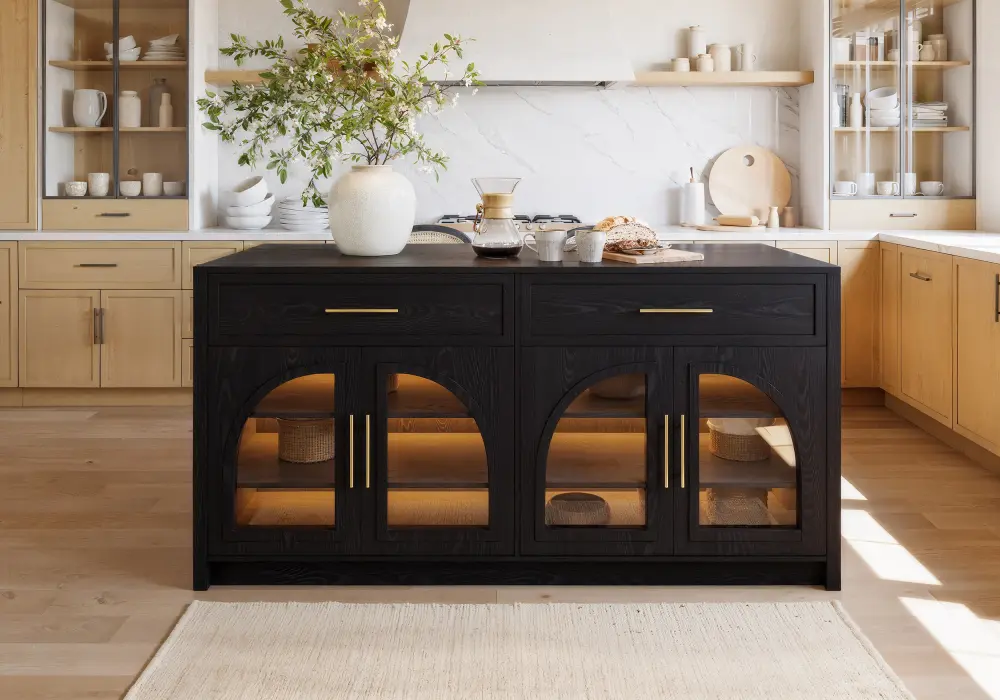
Fit in the drawing. In a one-wall kitchen, place it parallel to the cabinet run with a 42-inch aisle on the cooking side. A room depth of 134 inches also leaves a 36-inch walkway behind the island. In a galley or U-shape kitchen, 116 inches between the runs gives 42-inch aisles on both sides.
How it gets used:
- Coffee and bar station. Set a coffee machine or blender on the top and run its cord through the hidden cutout. Glasses and mugs sit on the adjustable shelves behind the glass doors.
- Hosting. Switch the lights to warm for dinner guests, then to cool and bright for cleanup. Glassware and serving pieces on display double as decoration.
- Everyday organization. The drawers hold cutlery, linens, and cooking tools, and the shelves can be moved to fit tall bottles or stacked plates.
Drawing tip. Draw the glass-door side facing the open room so the display storage shows, and mark the cable cutout side near your nearest outlet. Allow room for the doors to swing open without hitting a stool or the walkway.
Test the drawing with everyday movement
Walk through taking food from the refrigerator, prepping, cooking, and serving. Add a second person if the kitchen is shared. Open the dishwasher and island drawers in the drawing, then mark where each person stands.
Then tape the island's footprint on the floor. You will see the corner turns and sight lines that a drawing cannot show. Order only after you have confirmed the product's dimensioned drawing, the delivery path, and any power requirements.
Frequently Asked Questions
What scale should I use for a kitchen island drawing?
One graph-paper square per six inches works for a first study. Write the scale and the real dimensions on the page.
Should the island be centered in the kitchen?
Not always. Appliance access, prep areas, and seating often call for an offset position. Measure every gap, then adjust.
Which kitchen shapes can fit an island?
L-shape and U-shape kitchens fit one most easily. One-wall kitchens need a room depth of about 134 inches. Galley kitchens need at least 116 inches between the runs, or a narrower cart instead.
Do I draw the island base or the full countertop?
Draw the full footprint, including overhangs, then add base and storage openings.
How much space do I need behind island seating?
The NKBA guidelines suggest at least 36 inches to edge past a seated person and 44 inches to walk past.
Is a closed-door plan enough?
No. Add open doors, drawers, and occupied stools to see the true aisle widths.